Andrew & Amanda LeJeune

Growing Undivided Hearts of Love for our Savior

DIY: Advent Calendar Pinboard December 7, 2011

Filed under: Uncategorized — Andrew & Amanda LeJeune @ 3:19 am

Last Christmas I saw this cool tutorial by Katie over at Bower Power. I really wanted to do it last Christmas, but I didn’t. But I finally did it this Christmas with my 2nd trimester energy! I really like it.

The inspiration comes from the Pottery Barn Linen Board Advent Calendar below.

ImageHere’s the breakdown of how I managed to use everything I already owned to complete this project. It does involve some creativity 🙂

I didn’t have a pinboard on hand, BUT I did have a roll of cork. I also had some cardboard from a big box that Reynen’s Christmas present came in.  I cut out two equal pieces of cardboard and glued them together. I laid a couple of heavy books on them for a whole day just to ensure they’d stick well together.

Once my base looked good, I cut out a piece of my cork to and once again used my craft glue to adhere the cork to my backing. Again I laid books on it and let it dry well before moving on.

Here’s a snapshot of my layers. Obviously it’s not the prettiest thing, but it all worked out in the end. You can see two layers of cardboard and then the cork on top.

Image

Here’s what it looked like right after everything was assembled:

Image

Next step was attaching my linen burlap fabric that I already owned. It looks just like linen, only has a more nubby texture to it. I was relieved that I had a piece that was just the right size to stretch it over my board. I used a staple gun to wrap the board like a present.

ImageThe next part required more creativity. To find all the trinkets/ornaments for my advent calendar, I pulled all my existing ornaments out and had about 14 to use that were in the silver/gold/clear/shiny category. I was about to go out and buy 11 more ornaments when my friend Dani suggested I look around for some trinkets to use. So I searched our place high and low and found

  1. White beaded floral pick to cut a piece off
  2. A gemstone brooch
  3. Photo hanging wire and some scrapbook paper to make a custom “L” shape ornament
  4. A cork that had a wire cap on it for me to use as a hanger
  5. A few mini pine cones I could wrap together
  6. A golden star cookie cutter
  7. A straw ball from a bowl of potpourri
  8. Several loose keys to create a strand
  9. Andrew’s Aggie ring
  10. A cluster of sticks from outside
  11. A mini heart shaped whisk from the kitchen

So I ended up having everything I needed to create my advent! I also had the EXACTLY 25 gold headed push pins too 🙂 The rest involved making a template out of white cardstock for the numbers and gift tagish backgrounds. My number sheets were about 1″x2″  and I used a gold sharpie for the numbers.  I pushed the pin into both pieces at the same time to attach the numbers on top of my white gift tag looking pieces.

So here’s my finished product:


I like it! As far as hanging it goes. I hot glued a wide grossgrain ribbon loop to the upper/ mid-back section of cardboard and hung it on a finishing nail. Because it wasn’t a great hanger for the board, I did have to use a small square of double adhesive tape to keep my board level on the wall. So there you have it: my DIY Advent Calendar!


ornament_advent_calendar

Filed under: Uncategorized — Andrew & Amanda LeJeune @ 2:39 am

ornament_advent_calendar


DIY: Custom Tufted Headboard November 29, 2011

Filed under: Uncategorized — Andrew & Amanda LeJeune @ 5:24 pm

Image

I’ve been meaning to post several DIY projects I’ve done, as well as decorating the house pictures that I’ve wanted to post. So I’ll be posting a couple over the next days.

I’m sure there are many ways to do a customized headboard, but after reading several blogs online, this is how I tackled the project.

I started out by measuring the width I desired, which for us was 4″ bigger than our bed to allow 2″ on each side. Since I wanted the headboard to be 6′ tall, I bought 2 pieces of plywood and had Lowe’s cut it for me in the store to where I had a 4′ tall piece and a 2′ tall piece.

Image

To assemble the two pieces to make my headboard, I grabbed 8 metal tie plates and some screws. Then I staggered 4 of them on one side and staggered them differently on the reverse side so it would be stable.

Image

Image

Image

Once it was assembled, I decided on where I wanted my tufts to be once I upholstered the headboard. After I marked each to-be tuft with an a penciled “X” mark, I used a small drill bit (big enough for a needle to go through, but not too big) to make my holes. It’s best if you do this step PRIOR to putting batting and fabric so it’s easier to create evenly spaced tufts.

ImageNext was putting on the batting. I didn’t have to use any adhesive since the wood grabbed the batting nice and snugly.  I also the batting I bought wasn’t 6′ wide, but I didn’t really need to pay for more batting that would just be on the bottom of the headboard and not leaned against. So I just bought enough to cover the top half of the headboard. The trickier part to this project was creating the custom fabric piece to cover it. I bought enough fabric to create 3 equal pieces which I sewed to together in order to have 1 big panel for the board. Even though I do have creases on the headboard, you can hardly tell. The rest was easy. Just pulled  tightly and wrapped the board like a present using a staple gun as I went along. I made sure to pull tightly, so that when I did make my tufts the would stand out more.

Image

Last item was to create the tufts. This was the other trickier part of the project, but it turned out great.  I used a method I had seen online. I bought some upholstery thread (you want it to be tough enough to withstand the strain and pull you’ll be putting on it) and then used a regular needle and some buttons.


So here’s what I did. I wove the needle and thread through the button to the front of the headboard and back through the button, using it as the anchor in the back.  Once I felt I had gone through enough times and it was creating a nice tuft. I secured a small finishing nail right next to the button for me to tie the thread off.  And then hammered the nail on top of the button to secure it.  Woila! Tuft completed. The hard part of this stage in the project was being able to make the tufts in the middle of the board. My arm wasn’t able to reach over and do it all by myself.  I had to have Andrew at some points receiving the needle on the other side and threading it back to me.  But we got all of them done and it was a finished project!


I’m very proud of my DIY headboard and had fun with it.  As for costs, it was about a $40-50 project with the batting, fabric, upholstery thread, wood, metal ties, and screws. But I have leftover wood pieces and screws, so not too bad for a custom fit headboard.  🙂


Fall Decor! September 27, 2011

Filed under: Uncategorized — Andrew & Amanda LeJeune @ 2:27 am

Today was productive for me.  I:

  • Cleaned the bathroom
  • Made Jell-O
  • Put out Fall decor
  • Stapled and screwed the dining chair seat to the frame
  • Made dinner (chicken, mac-n-cheese, and fresh corn on the cob)
  • Cleaned off our dresser top

I love days when things get done and I have energy to do them.  Thought I’d share my fall decor from today. Andrew liked it.

table decor with old root beer bottles and wheat

I used three old Root Beer bottles I’ve kept and some wheat I got from Hob Lob. I put down a brown scarf/runner under it. Flanking those bottles are two vintage ceramic bowls that have fall colored veggies on them.  I filled them with mini pine cones I scavenged during our family Colorado vacation this summer.  I have plans to use them during Christmas time too.

fireplace mantle

Again I used the wheat and put them in glass mason jars and put one on each side of the mantle for balance. I like them 🙂

I’ve always wanted to do this and finally did. I stuffed a bunch of scrap fall-themed fabric pieces together in a glass vase. I then set it on top of a piece of burlap I had. Burlap = Fall!

Here I just switched out our normal blue candle for a plum colored one and put the jewel toned pillow cover on one existing pillow. I also threw another Indian/patchwork/fall colored pillow cover on another one for the couch but I don’t have a picture of that.

Waste not want not. I took the leftover stubble from cutting the wheat and tied it with a brown ribbon and set it on my brown leaf plate. This is setting on an end table in the living room.

Well there you have it. Beginnings of fall decorating! Loving it!  Can’t wait to grab a few pumpkins here soon 🙂


Party Over Here, Party Over There May 16, 2011

Filed under: Family,Pictures,Travel — Andrew & Amanda LeJeune @ 3:21 am

This month has been CELEBRATIONS galore. I partied with girlfriends, we celebrated Easter, we celebrated Mother’s Day, I partied with my sister & Josh and Kyndall & Keith (and Carsen!) in Dallas, and we’ve been planning Reynen’s big 1st birthday!

Almost 1! Enjoying the Splash Park!

Reynen just recently turned 11 months, which means only 1 more month to go before his BIG day! I’m so excited to CELEBRATE him and to throw him a party!  We’re planning on it being at Hensel Park, right across campus. It has a playground and lots of picnic tables, so I think it’s going to be fun. 🙂

I’m excited to make  the infamous Martha Stewart tissue balls and a homemade pennant flag banner for him, as well as making the cupcakes and Reynen’s smash cake! I’m also really trying to think of something special to do for Reynen to honor him.  I’ll fill you all in after the big bash on what we finally chose to do.  It’s gonna be so much fun!

Hannah & Jaclyn

I also road tripped it up with my homegirls from HG, CELEBRATING our friendships. We spent all day Saturday in downtown Houston looking through Anthropolgie & Pottery Barn, grabbing Starbucks, sharing our likes/dislikes on decor, sharing our lives and issues, eating at Panera Bread, sharing a shoulder to cry on, and eating some AMAZING chocolate cake at The Chocolate Bar.  My in-laws were awesome to come grab Reynen and play with him all day while I hung with the ladies. We had an awesome time!

Me & Andi

We’ve also been hanging out with our homegroup CELEBRATING the end of the semester. Last week we had a family movie night and watched Cloudy With A Chance of Meatballs.  It was hysterical! We were laughing the whole time. Super funny movie.  We’re about to launch our planning time this week for our summer with HG. Really seeking God on what he’d have us do together this summer.

being a boy - playing in the dirt

This last month we also went out to Lake Sommerville to go fishing to CELEBRATE Andrew being finally done with his student teaching. He’s officially a teacher now! Woohoo. I’m so proud of him. Oh, and just a word of caution. Fishing with a baby in tow is not that easy.  Or let me rephrase, trying to fish TOGETHER with a baby is difficult. We tried the pack-n-play, but he wanted out and to be walking around, so one of us had to be holding, feeding, loving, entertaining him at all times. But even still, we caught some fish! 🙂 At the end of the day, Reynen just sat down and threw dirt all over himself….what a boy.

We’ve seen both sides of the family this month too. We got to see my parents and littlest brother, Joel, on their way back from registering for classes at Ouachita Baptist in Arkansas.  Then last weekend we saw Andrew’s parents and sister at her last dance show.  We also CELEBRATED Katey’s 18th birthday.

I’ve also helped Allison & Josh CELEBRATE his new job by house hunting in Granbury with Allison. Josh watched the kiddos for us all day (what a tropper!) and we drove around all day, hanging out as sisters. It was such a good time together. I also saw the Dollars while I was there, which was the cherry on top!

I also CELEBRATED my 1st Mother’s Day. Reynen gave me a hug! Andrew wrote me a sweet note, we ate with our friends at Pei Wei and had good conversation, and then I got a frappuccino!  The day was a reminder of how truly blessed I am to be a mother. I’m so grateful.

We also CELEBRATED Chirst rising from the grave this month. If he hadn’t been raised from the dead, all hope would be lost.  So I am thankful that he did and that he offers me hope through his resurrected life.

So as you can see, we have been CELEBRATING A LOT over here and have even more to do with graduations and birthdays coming up in a few weeks!


Old Wooden Chair Redo April 8, 2011

Filed under: Arts & Crafts,Decorating — Andrew & Amanda LeJeune @ 10:19 pm

I recently got to refinish an old wooden chair (something I’ve wanted to do for a while). Our neighbors had 2 old wooden chairs on their curb ready for the dump, but I asked if I could take them instead. Of course they agreed. The other one I haven’t touched yet, but I did get to redo one of them.

Here’s the chair in it’s moldy, worn, ugly state:

I went out and bought some 100 grit sand paper, two 2″ angled brushes, and a can of interior/exterior primer. I’ve had this small can of Glidden paint which has been itching to see it’s debut for a while, and it’s day is finally here!  After sanding it (which isn’t hard, but took me some time) and 1 coat of primer, I let it dry for over an hour. Then I put on 2 coats of Spring Leaf by Glidden. I used an oil based primer and latex interior paint.  Since the paint I used is really meant for walls and interiors, I plan on putting a coat of Polyurethane to protect it since it’s sitting outside. I just have to wait until the end of the month for funds.

So here is the Ugly Duckling turned Swan Princess (in chair world):

The chair is settled right next to the front door. In fact I’m actually sitting in it writing this post! It’s such a fun fresh spring color and looks great.

I did learn a few things from this paint job to take onto the next:

  • Don’t skimp on sanding. I was eager to get going with the project and paint (you know the fun parts 🙂 ), but I should have taken a little more time and sanded out a few other areas.
  • Not to worry about coats of paint being too thin. Better to have multiple coats than some clumpy or goopy spots.
  • Try hard not to go over anything immediately after painting it, because it does get sticky/tacky as it drys which makes your paint job look tacky.

So there’s ugly chair turned better than it was. Not perfect, but a fun project none the less!


Home Tour: Kitchen April 1, 2011

Filed under: Uncategorized — Andrew & Amanda LeJeune @ 8:35 pm

Alright! Last home tour post. Let’s take a look at our kitchen this time. I really enjoy being in our kitchen. I enjoy baking, cooking, and using my espresso machine.

So here’s the BEFORE:

Now here are the AFTERS:

There’s not a lot different as far as what you see at first glance.  But it is less cluttered than before, which is great! I recently purged of some kitchen items and am trying to sell a few things.  Getting things that aren’t used everyday or nearly everyday keeps things looking neater and prettier. In addition to less clutter both on the counters and in the shelves, I’ve branched out of the whole black & red exclusive color scheme. I have a yellow Anthro dish towel, yellow teapot, colorful cookbooks displayed, and put out some yellow fruit usually.

I love my Anthro dish towel. Pretty pricey, but it’s so super cute! I also enjoy my pop of yellow in the teapot and the blue olive oil ceramic bottle.  The backsplash here looks really pink for some reason; it’s tends to look a little pinkish even though they meant for it to a tan color. Oh well.

Reminder when I shared in the Living Room post, that I rip out magazine pages. Well the big Brown and White geometric print binder holds all my loose leaf recipes. I’ve sorted them in categories like appetizers, main dishes, and desserts. So all my Women’s Day magazines & printed recipes go in sheet protectors and get store on the counter.  Now the teal peacock feather binder to the right of the fat one has the same concept, but it holds loose leaf pages from magazines that  I really liked. Everything from decor ideas, articles on how to throw a successful garage sale, spring cleaning checklists, etc. are in sheet protectors and filed in here. It’s fun to disguise all those pages with these cute binders. Plus they add a lot of fun to our kitchen.

I really like old glass jars and old retro cans. The little tea canister sits on top of a funky candle from Target (smells like Pomegrante 🙂 )

So after cleaning the kitchen for this post, I went ahead and left the dishes up for a “true to life” shot. The truth is, we always have dishes either in the sink or in the drying rack. It’s the nature of having no dishwasher, and we cook everyday, sometimes 2 times a day, so they just pile up.  I great way to save on storage in a smaller kitchen and greater accessibility is to use a pot hanger like we have. I love this feature in our kitchen.  Before the shelf was there that entire wall was totally empty. Kinda weird right?  The rack and “S” hooks are from Ikea.

This is my morning nook 🙂 I make my coffee here most mornings. I love my espresso machine and my nifty burr grinder. They’re awesome.  Next to it is a make-shift fruit bowl. I took a pewter dish I had and a glass cake stand I wasn’t using and then added some rolled duck tape in between them. Voila! Isn’t ghetto fab-oo-lous fruit bowl!

In the pictures of the BEFORE, we had magnets and pictures everywhere on our fridge. I think I like having them more clumped together a little more neatly.  We have notes and letters that are important on the side of the fridge.

Last but not least is our pantry. We house charcoal, a whale bathtub, vacuum cleaner, mop/broom, and our pantry items. There are only 2 shelves in our pantry, which necessitated the use of an over the door pantry rack. I think we scored this at Bed Bath and Beyond. I hold mostly spices and baby food in here. Great way to boost storage!

So there you have it folks. I guess the only thing I left out was to open my fridge “Cribs” style, but oh well. That’s not the pretty stuff anyway 🙂 Thanks for joining me in Tour de LeJeune!


Home Tour: Dining Room March 30, 2011

Filed under: Uncategorized — Andrew & Amanda LeJeune @ 1:52 am

Welcome back to Home Tour at the LeJeunes! Let’s look at our dining room this time.  This room serves as our home office as well as where we dine as a little family.  Let’s take a look at the before:

It looks a lot bigger than it does now probably because there’s more stuff in it now.   Here’s what the place looks like now after the adjustments.

view from the kitchen

Just a few more decorative things and officey things here and there.  Our wine cart and dining room table were bought from my Nana’s neighbor in Galveston who was moving. My mom bought these for us right before we got married.   We paid only $25 for the wine cart and it’s a great piece. The top is a butcher block. I really had wanted to use it as an island in our kitchen, but our kitchen isn’t big enough, so it serves a different purpose for us. I store table linens, candles, decorative knick knacks, craft materials and fabric in this. The wine bottle slots have a few old wine & beverage bottles that I like.  The three things on our wall over our dining room table are a large hammered circle piece we got as a wedding present, our cake toppers “L”, and a picture Andrew bought for me in Italy 2 years ago.  He actually took a photo of the guy painting the portrait with the actual place he was painting in the foreground. I think it’s our only “real” piece of artwork. 🙂

Top of the Wine Cart

On top of the wine cart is our HP wireless printer (a Christmas present) and a basic 3 tiered file shelf that I spray painted paint (it had been black).  I just recently grabbed this wire scrolly shelf on clearance at Hobby Lobby for $15. I tried to outfit to incorporate both the office and kitchen elements this room has in it.

There are bowls, a cool Anthropologie mug, cloth napkins, cute apple thank you cards, and bowls filled with kitchen items (I’ve since removed the ruler, cuz it looked a little strange up there).  Above the shelf is our handmade Downtown Vancouver, Canada canvas. We bought a map of Vancouver over our honeymoon as our souvenir. When we got home we had some random piece of clear thin plastic and a canvas exactly the size of our map. So I painted the sides of the canvas to match the blue in the picture, put the map on top of the canvas and then stretched the plastic as tight as we could over it and used a staple gun to keep it in place. It turned out great! We love it, because we can see places that we visited on there and is a reminder of the great time we had.

This is my little sewing/fabric nook. I have fabrics sorted and bound my color in these drawers. On top is my sewing cubby (and also where Andrew like to stash his morning devo materials). In the back I have wrapping paper held in a tall vase I had.

This is command central for all things bill, schedule, office supply, filing, and storing related. You can see what the black shelf used to look like without the fabric curtain.

Things look different under there now but some is the same. We keep our drill, light bulbs, scrapbook bag, file box, acrylic paints, old check book carbon copies, etc. in this storage area. To conceal all the storage but also give us a way to access it easily, I just made to panels that act like doors on the front. I used a piece of peel and stick Velcro to attach the panels, by sewing on the fuzzy side to the fabric and then wrapping the adhesive side to the metal shelf. I has stuck on there really well too.

On top of the shelf I used a basket that held wedding favors to corral tape, scissors, highlighters and more for easy access.

I had these Russian doll colorful boxes that I use to hold note pads and such.  The pens are in a round clear glass vase.  And one of my favorite projects was creating this little stationary/card catalog out of small wooden trunk type thing I had. I made dividers out of cardboard and covered them with fun scrapbook paper, then labeled each one “Blank”, “Holiday”, “Thank You”, etc. I enjoy collecting cute, spunky stationary to write notes on!

Next to this is a stacking file sorter that I scored at Goodwill for 99¢! I try to (key word try) put things that need to be looked at in the first slot, things that are still pending move up to the next tier, and then things that need to be filed away in the last tier. Then every so often, or when it’s full, I file them in our file box below.

Well I think that’s all for now! Feel free to ask me any questions or if I didn’t talk about something you’re curious about, just comment.  Thanks for tuning in!


Home Tour: Living Room March 23, 2011

Filed under: Decorating — Andrew & Amanda LeJeune @ 7:53 pm

Hey there! Back again with some photos and chatting about our little casa. This time we’re looking at our living room. This room as had the most significant changes out of any of them, because it’s needed to serve different functions so many times. I’d say at the beginning it looked like a college dorm room, random and uh…youthful? But this was right after being in college so it’s no wonder it looked like this:

I would say pardon the keyboard, but let’s be honest, it wouldn’t make things look awesome if that weren’t on the ground. Now let’s take a look at it these days:

Quite a difference, huh? I think it looks just a little bit more grown up than a college dorm. Of course prior to it having a crib in it, the living room used to house a full size couch on that wall with the window AND the smaller love seat (placed where the crib is now). We used to have the small white bookshelf in our room where the changing table is now.  The picture rectangle on the wall kinda looks wonky, but in person it looks much straighter. I just used the most similar frames I owned (browns, muted silvers) and then took the wooden frames/mirror I already had and painted them teal, arranged them on the floor in a way that worked out best and then hung them with command strips and nails. The pictures in them frames consist of all sorts of photos: from wedding photos, to a birth collage, to Reynen’s foot prints, kid art, and family photos.  It’s an assortment and they can always be changed. The big brown ottoman is the ottoman that came with the free hand-me-down love seat. It’s got a hunter green & maroon fishing patterned fabric underneath. I bought a cream sofa cover for the love seat, but they don’t make ottoman covers for our over sized storage ottoman. I had to make my own and figured that since feet would be on it, brown would be best.  The ottoman holds a few decorative items, coffee table books, software, extension cords, and gift bags.

Let’s take a closer look a few things that I really love about this room.


Crib Storage

On of the best things about our crib is that it has this under the bed storage drawer. As you can see we have plenty of things in it. This kid has got a lot of toys…many of which are waiting to be gifted to others (sorry pregnant friends, hope you’re not offended :)) When I was looking for a crib, this was one of my top features I wanted because storage is precious when you have little space for your growing family.

Our “nursery” colors were bright colors of all sorts, so this little shelf above Reynen’s bed fits in great. I love the green alligator and fun picture frames.

Reynen's Dresser

Because of how much we were BLESSED at our showers, we had a LOT of clothes. In fact, I haven’t had to buy a single item of clothing (minus a baby swimsuit) in the last 9.5 months! Awesome, awesome! So we needed a place to store all of the new baby things we received. We use the changing table/dresser in our bedroom for our clothes, since most people don’t want to see our unmentionables in the living room baskets. 🙂 I thought about grabbing the same baskets for the entire thing and only putting baskets in 2 of the rows, but then I found these colorful bigger ones at Target on sale. I also saw after arranging the baskets, I needed more storage, so i grabbed up three and arranged them in a mix-n-match pattern. They’re not the same size, but I think they look alright. It also helps that the smaller baskets get fuller and resemble the green ones height. I have baby blankets, bibs/burp cloths, cloth diapers, pjs, changing pad cover/diaper bag, pants, and outfits in these. I also put bright blue labels attached with ribbon on each of them, but my precious son has eaten a few 🙂

This is an antique side table from my great grandmother. I have a basket of toys and animals next to our love seat. The yellow bag (was a gift bag from a friend made from burlap) holds Reynen’s socks, shoes, and hats. It gets stowed away perfectly.  The bag was perfect because of it’s bright yellow print and the height!


entry way

Another one of my FAVORITE things in our apartment is this rocker. My Nana gave it to me after Hurricane Ike hit Galveston. She’d had this in her home for a long time. I had it reupholstered in this fun blue fabric, put a jewel tone orange pillow and a bright green frog on it (from my brother’s Japan visit). I love having vintage family pieces. Our entry way looks about the same as it always has. We used to pin papers on our corkboard, but it looked cluttered. So now we just have our world map and a few wooden International pieces on the entry way shelf.

This is right beside the door and behind our rocking chair. I LOVE using natural colored baskets to corral things. We use the big one to hold our shoes and the other holds my bible study material and magazines. I try to keep this basket less cluttered by ripping out the pages of the magazine that I like and combining them in a big binder. More on that when I talk about our kitchen.  We are blessed to have instruments…truly. They are also just bigger & bulky. The piano stays under our bed in a case and the guitar sits here for now….I might move it into our closet soon. Who knows.

I think that wraps up the living room/nursery post.  Enjoy making your space functional and fun!


Home Tour: Bedroom March 14, 2011

Filed under: Decorating — Andrew & Amanda LeJeune @ 5:13 am

Back again for some home touring! Let’s take a look at our bedroom transformation. This room really has come a long way.

Bedroom back in the day

Now let’s take a look at the bedroom, 2.5+ years later:

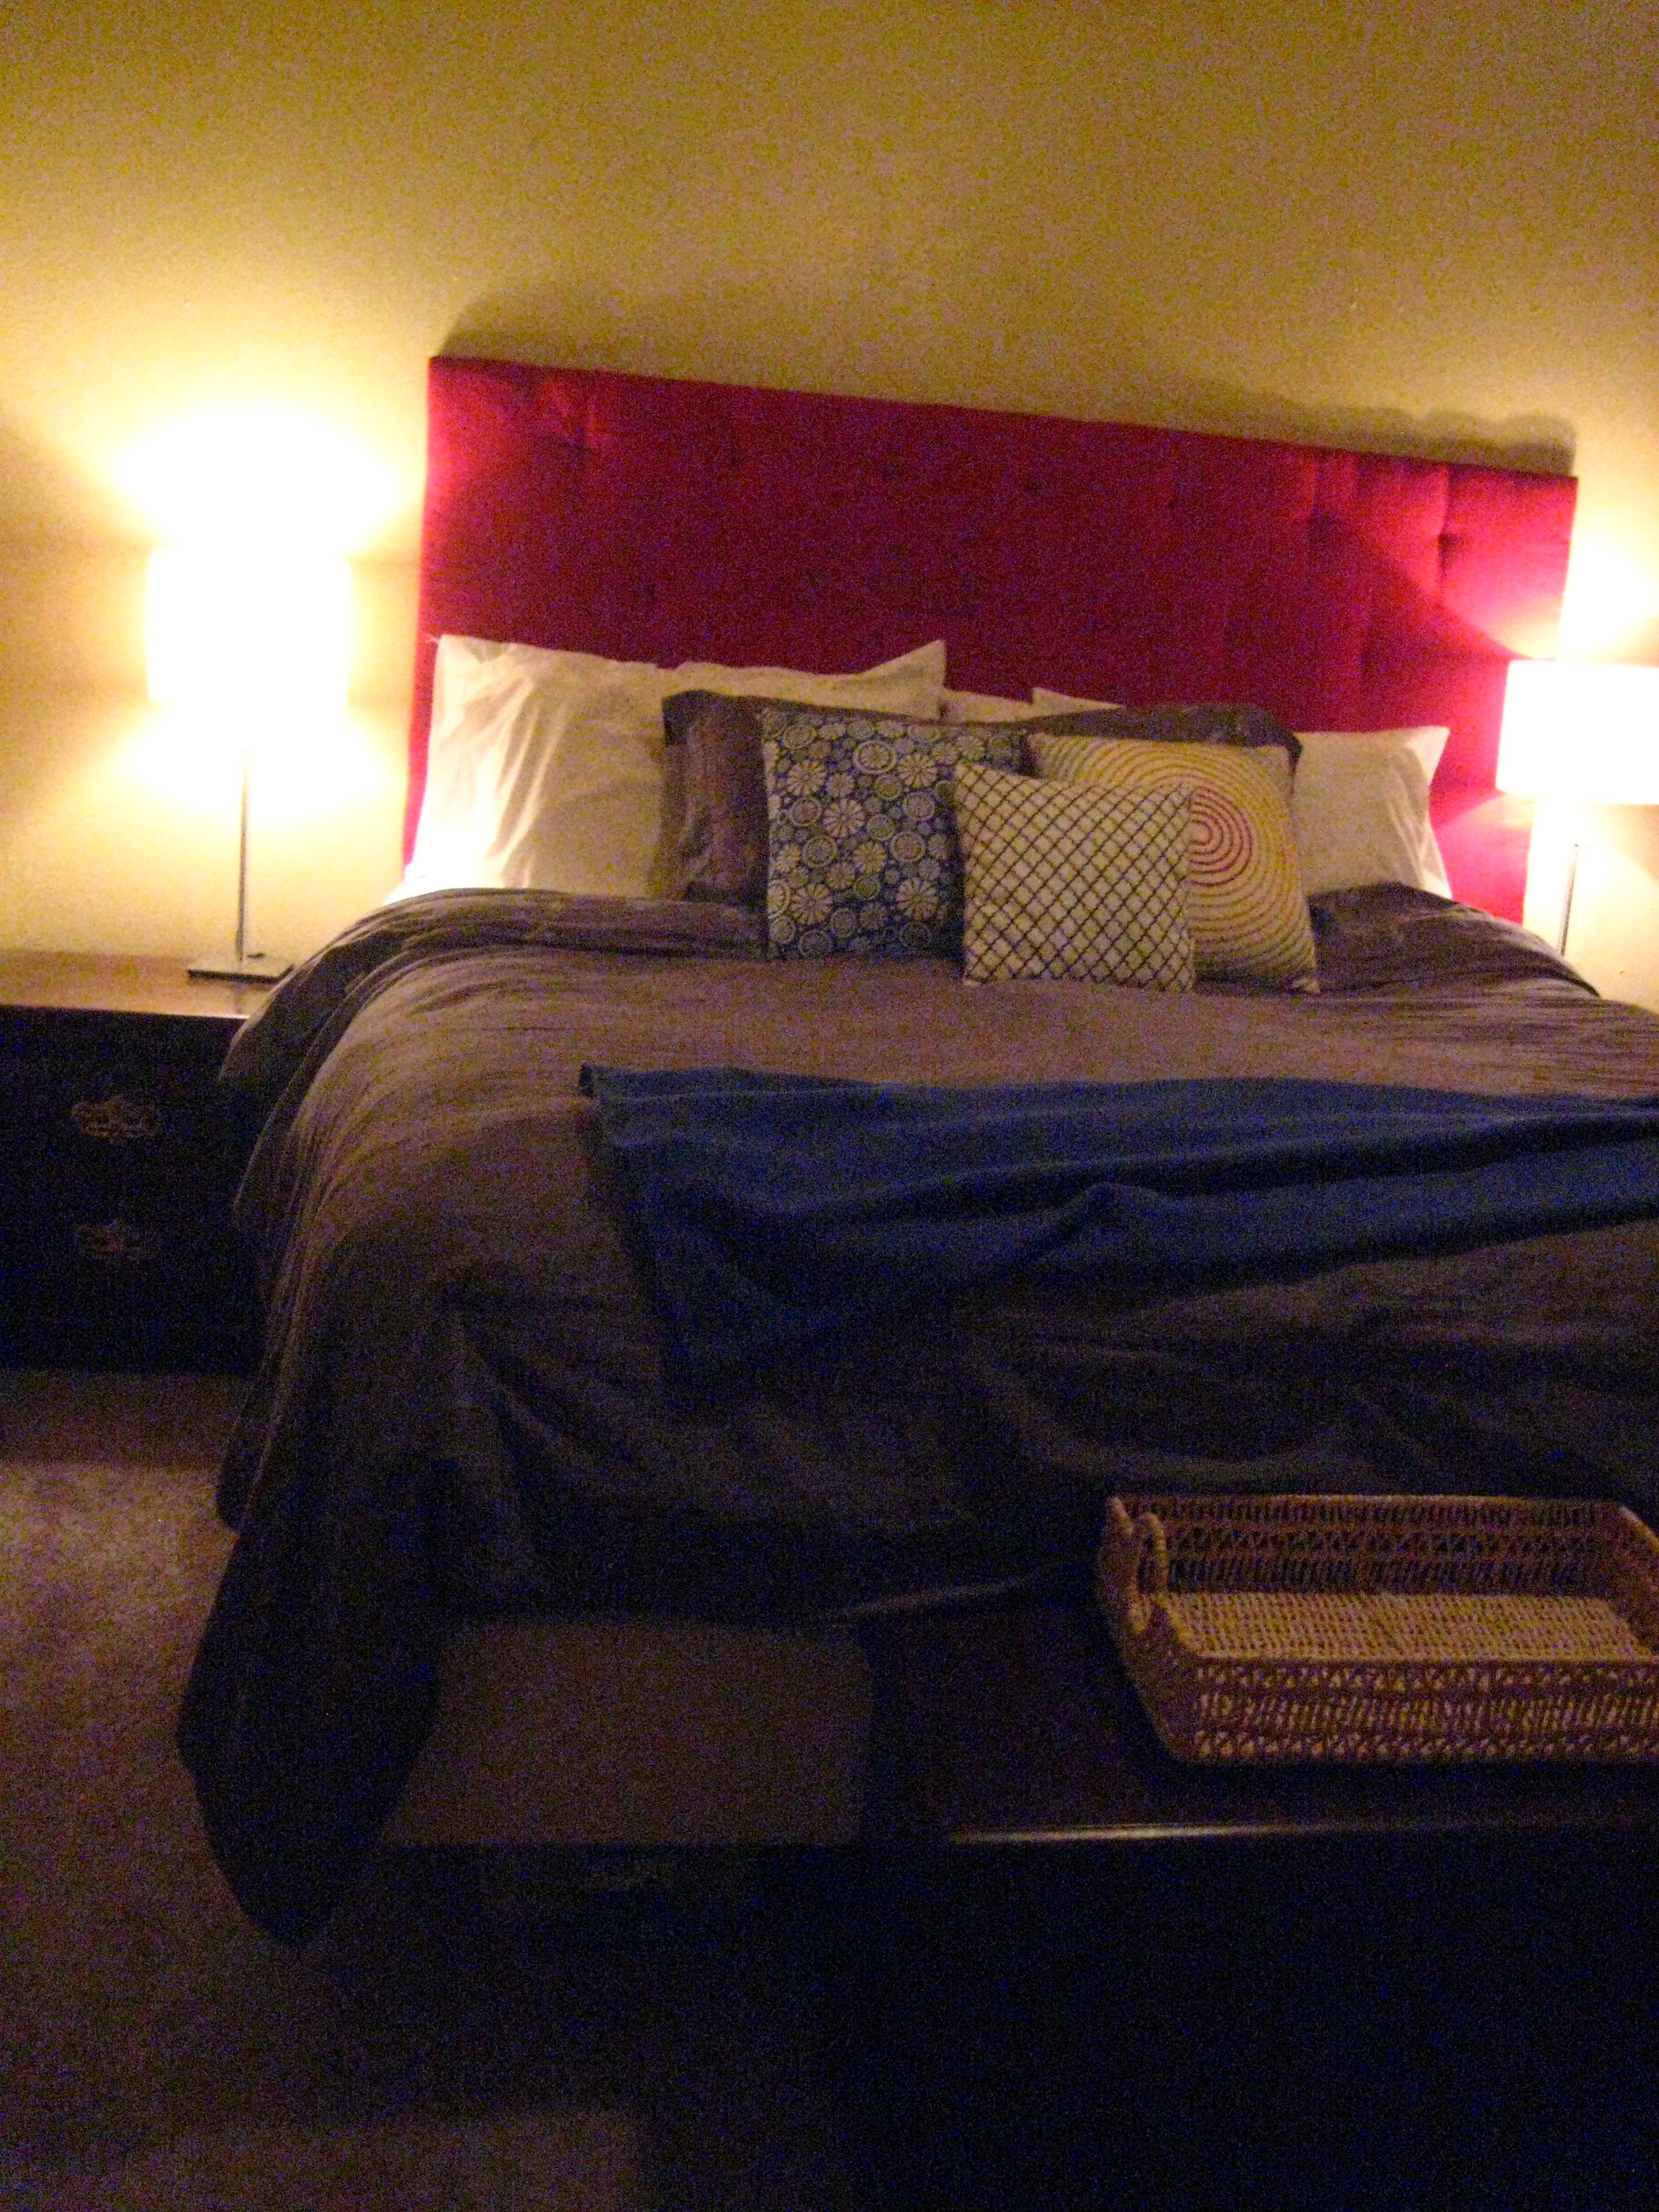
Here’s looking at the room from our bathroom. You can see that things look a LOT different.  There are several really special pieces that make this bedroom “ours.”  Take the artwork over the bed. Andrew and I painted that on a date night of ours at Muldoons (a new Moroccan coffee shop). We brought our canvases, paint, and baby and set up shop. What’s really special about the piece is that it’s symbolic of Revelation 19, the passage of the wedding ceremony of the Lamb and his Bride. This passage was read at our wedding as our gospel presentation.

Then a voice came from the throne, saying:

“Praise our God,
all you his servants,
you who fear him,
both great and small!”

Then I heard what sounded like a great multitude, like the roar of rushing waters and like loud peals of thunder, shouting:

“Hallelujah!
For our Lord God Almighty reigns.
Let us rejoice and be glad
and give him glory!
For the wedding of the Lamb has come,
and his bride has made herself ready.
Fine linen, bright and clean,
was given her to wear.”

(Fine linen stands for the righteous acts of God’s holy people.)

Then the angel said to me, “Write this: Blessed are those who are invited to the wedding supper of the Lamb!” And he added, “These are the true words of God.”

The painting actually is a colored representation of Rev. 19:11-19. We thought it would be appropriate and special to do something symbolic of this passage since it was from our wedding. We considered drawing Jesus on the white horse coming back for his bride…but opted for something a little more attainable for us unskilled artists. So we took all the colors represented in passage: the WHITE horse that Christ rides, the CROWNS (GOLD) on his head, the robe dipped in BLOOD (RED), the sharp SWORD and IRON (SILVER) scepter with him, and the armies with him dressed in fine linen, WHITE and clean. The BLUE dots symbolize the parting of the clouds. There are 3 crowns above the white dot in the second row (which is Christ), with the sword and iron scepter to either side of him. The other white dots all around are the army and the red dot is his blood dipped robe. I love that it was something we did together! It’s dear to me and I think it’s really cool looking too.

my side

This is my little white side table, inherited to me by a former roomate, Ashley. The lamps are a new wonderful gift from my mom. you can’t really see them in the pictures, but you can see them here. The added bonus of these guys (besides actually matching!) is they are height adjustable for my tall hubby! You can see from the old picture that we changed out the yellow curtains for these white ones from Ikea. This is another special thing to me…all the curtains in our room where picked out by Andrew and I together. It was actually a fun time at Ikea together deciding on which ones to buy. Andrew was the one to come up with the drapping canopy thing above our bed. We’ve had that ever since we got married, and it’s a romantic touch from him 🙂 And functionally it acts as our “headboard” of sorts. On my bedside table is a funky patterned, yellow Kleenex box of all things (amazing what you can repurpose!). I use this to store my small calendar and pens. There’s also a picture taken while walking on campus right after we got engaged (thrilled faces turned towards one another, hand in hand for the first time) on my nightstand. Such a sweet reminder of the blessing of our union.

Our apartment actually came with closet doors, but because the room was limited in the space factor, I asked our landlords to remove them so they didn’t jut out into our space. The curtains are a perfect alternative and help us store things that may stick out farther here and there.

Andrew's side

I didn’t take an up close of Andrew’s “nightstand” because it’s not an actual night stand. It’s random boxes stacked on each other covered with a tan blanket/wooden table runner. It works, but it’s not pretty. Maybe we’ll be able to at some point DIY some matching side tables or purchase some cheap ones. But for right now, it holds camping equipment.  On Andrew’s wall are two pictures I gave him. One is a collage print of outdoor photos of mountains, our family at the lake, fishing, and camping. The other was his Christmas gift from me. I found this cool print with his favorite tree, a white birch tree. It’s made to look like it has the words “Love Never Fails” engraved in it. Just another marriage themed piece of art for our bedroom.

At the end of our bed is our beloved “Hope” chest and it really is a chest full of hope. My Pop made it for us as a wedding present, right before he died. He was supposed to marry us, but passed away 2 months before. What’s so special is that my Nana & Pop covered the bottom with cut out scriptures on hope. They’re still all sitting at the bottom of the chest. This is a valuable piece in our bedroom and holds memories, quilts, and important keepsakes. Next to it is a $5 inheritance from my wonderful friend Joelle. She was moving out of the Cherry Street house and didn’t want. I had always wanted a storage ottoman just like this. Thanks Joelle! I keep our picture albums & scrapbooks in it.

Bedroom/Baby Changing Room 🙂

When you live in 400 sq. feet, you get creative with how many tasks your space does.  We grabbed this dresser at Ikea when it was on clearance. Since it’s solid pine, I figured even though it works with our current gray, yellow, and blue theme in our bedroom, I can always sand and repaint it down the road. The hamper acts as our diaper pail (we line it with a black trash bag). The other storage basket keeps games, extra diapers, and our Ergo carrier. This is also where the car seat rests when it’s indoors.  On the wall is a free mirror I got from my old coworker and friend Brooke. Courtney Patty and I braved a hot day before she left and recovered it with white and yellow mosaic tiles. Gave us an excuse for JJ’s snow cones! The mirror reminds me of her (she’s in KY now) and our friendship. The print next to it is an old Greek calendar page. I like it a lot because not only does it contain our bedroom colors in it, but more importantly because it’s a picture of a white veranda with 2 chairs around a small table overlooking the sea. It makes me think of sitting outside enjoying Andrew’s company, just the two of us. The curtains are yellow stripped ones from Ikea and match the dresser, the yellow in our canvas art, and bed pillow great. Again, Andrew was in on purchasing these too. The boy’s got skillz!

Here’s the back of our bedroom door. Everyone  needs a mirror to make sure they don’t look crazy before they leave the house 🙂 Added bonus if you have the cutest little boy in your mirror 🙂 I hang my scarves on the mirror and we have 2 prints of these exotic purple and green flowers on black mats on the small wall of the closet.  Nothing fancy here.

Well I think that wraps up the bedroom tour. We enjoy our little oasis for the two of us, sometimes three of us if we’re all helping change Rey Rey’s diaper. 😉
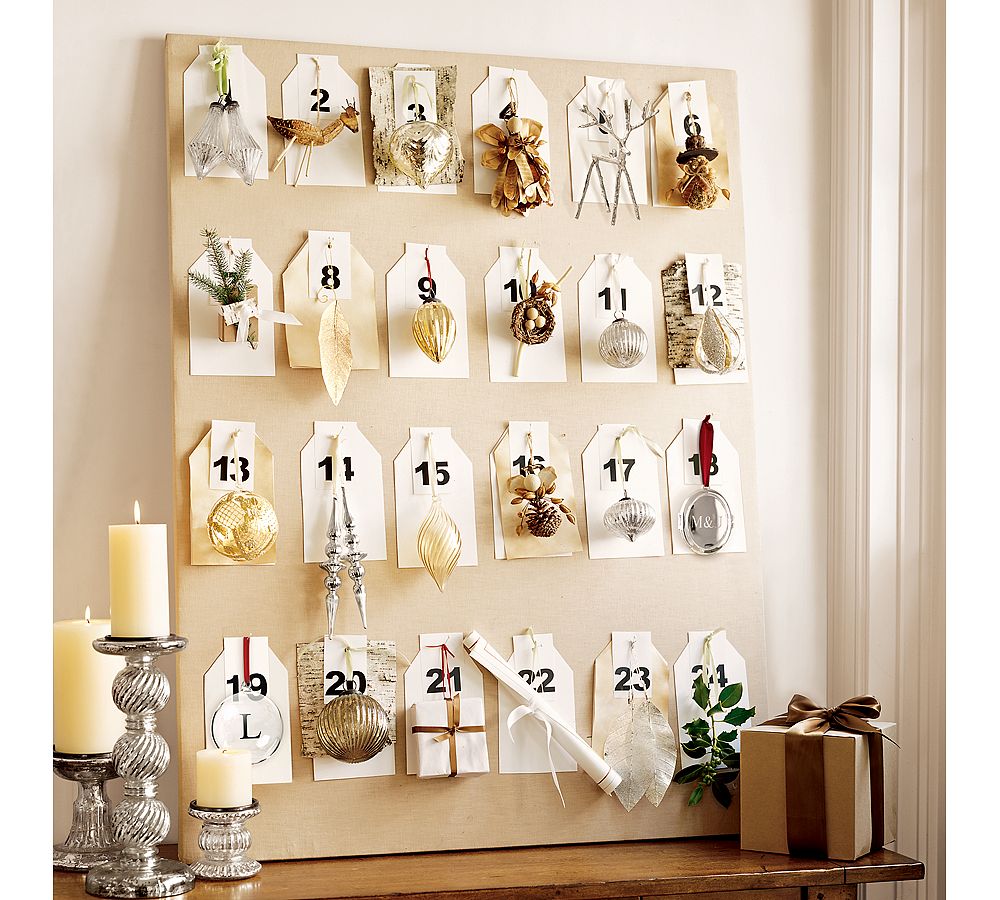